

Which Of The Following Allows You To Enter, Modify, Delete Or View Data Records?
Lesson 6: Entering and Editing Information in Tables
/en/access2007/building-table-relationships/content/
Introduction
 Access 2007 databases concur the bodily data records inside tables. You can add together, edit, and delete records directly from these tables. This lesson volition show you how to work in the tables to add new records, likewise as how to edit existing records using commands like copy and paste and find and replace. It will besides discuss the dangers involved in deleting records from a table, as well as the importance of setting validation rules and other field properties to ensure data is valid.
Calculation and editing data in tables
Download the instance to piece of work along with the video.
Adding records to tables
When you enter records into your table, yous are populating the database. In Access 2007, yous can do this a few dissimilar ways.
To add records in the new record row:
- Click the record row with the asterisk that appears at the lesser of the table.
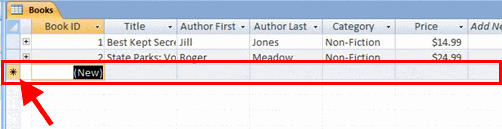 New Record Row
 - Type the information into the appropriate fields.
- Striking Enter or the Tab cardinal to move to the next field.
To add records with the New Record navigation button:
- Click the New Record push in the navigation bar. The navigation bar is located in the bottom-left corner of the open up object pane.
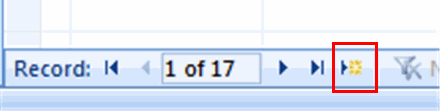 New Record Navigation Push button
 - Blazon information into the appropriate fields.
- Hit Enter or the Tab key to move to the next field.
To add records with the New Record command:
- Click the New Record control in the Records group in the Ribbon.
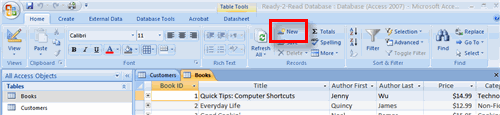 New Record Control
 - Type the data into the appropriate fields.
- Hit the Enter or the Tab central to move to the next field.
Editing records in tables
Sometimes information technology is necessary to edit records in the database. Similar with every other task in Access 2007, this can be done several dissimilar ways.
To edit a record straight:
- Scroll through the records, or use the navigation buttons on the navigation bar to find the record to edit.
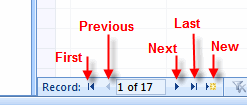 Navigation Buttons
 - Click the cell containing the data that must be edited. A pencil icon appears to betoken edit style.
 Edit Record Mode
 - Type the new information into the field.
- Click outside of the tape row to utilize the modify.
To edit a record using Find and Replace:
- Click the Find command in the Notice group on the Ribbon.
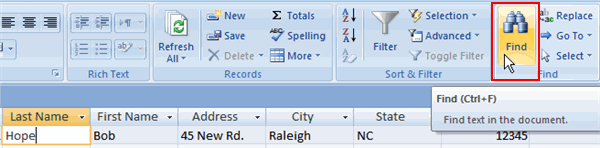 Notice Command
 - The Find and Replace dialog box opens.
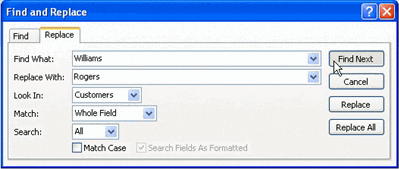 Find and Supersede Dialog Box
 - Tell Access what to discover past typing it into the Observe What: area.
- Type the supervene upon term in the Replace With: expanse.
- Tell Access where to look with the Look In: driblet-downwardly list. The first selection in the drib-downward list is the field you were last in within the table.
- Tell Access what to Match: Whatsoever function of the field, the whole field, or just the start of the field.
- Tell Access how to Search: Upwardly finds records above the cursor, Down finds records beneath the cursor, and All searches all records.
- Click i of the activity options:
- Find Side by side will find the next instance of the give-and-take in the table.
- Replace will put the new word into the table, overwriting what is currently at that place.
- Abolish stops the editing process.
Caution: DO NOT employ Supercede All considering it will overwrite every example of the Find term in the table, which tin can take a serious impact on your information.
To re-create and paste a pecord:
- Select the record you want to re-create. Right-click, so select Re-create.
- Select the new record row. Right-click and select Paste. The record information appears with a new tape ID number.
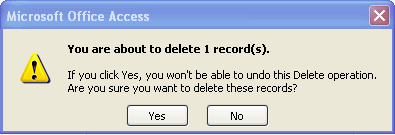
To delete a record:
- Select the record you want to delete, then correct-click and select Delete Record.
- A dialog box appears, telling y'all the action cannot be undone and asking if you lot are sure you want to delete the record.
 Delete Record Dialog Box
There may exist other records that rely on the record you are trying to delete. DO Non delete a record without knowing how information technology volition bear upon the remainder of your database.
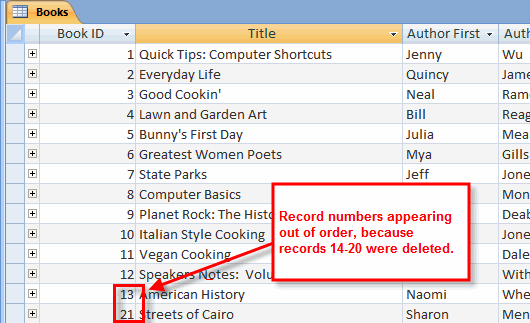 Tape Numbering subsequently Deleting Records
When y'all delete a record, the record number is permanently deleted from the database table. If y'all delete the terminal record from a table so add a new record, your new record numbers will appear to be out of sequence.
Data validation
Information validation is an important database concept. It is the process by which Admission tests the data that is being entered into the database to brand sure it is in an acceptable—or valid—format.
Let's say one of your database users has entered an gild date of January 4, 2008, in the month/engagement/year format as 01/04/2008. Another user has entered an order placed on that same engagement in the solar day/calendar month/year format as 04/01/2008. If the database is tracking all sales for the month of January 2008, it may non show both orders as placed in January, even though both were placed on the same date.
Admission 2007 allows you to set field properties and data validation rules to strength the person inbound information to follow a specific format.
Information types and validation rules
Data validation begins when information types are set during the process of building tables and fields. For example, if a field information type had been set to Currency and a text value is entered in that table field during data entry, Admission will not accept an invalid format and will brandish a validation error, similar the 1 below.
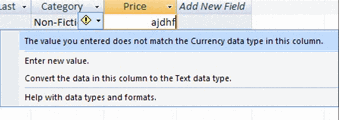 Data Validation Mistake Message
Data validation is accomplished by setting data validation rules and other field backdrop for various fields.
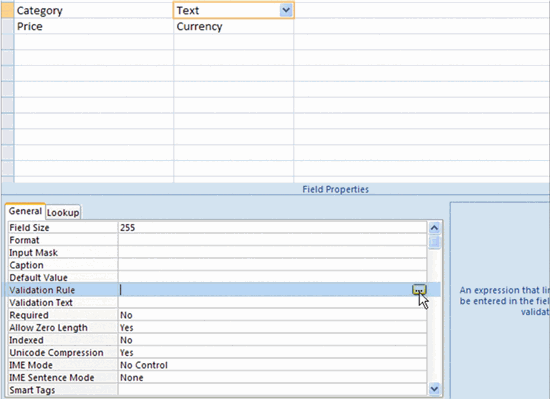
To set data validation rules:
- In Pattern view, highlight the field that requires a validation rule.
- In the Field Backdrop section at the lesser one-half of the window, set your validation rule using the Expression Builder. The Expression Architect offers common syntax to set up a data validation rule.
 Apply Expression Builder to Enter Validation Dominion
 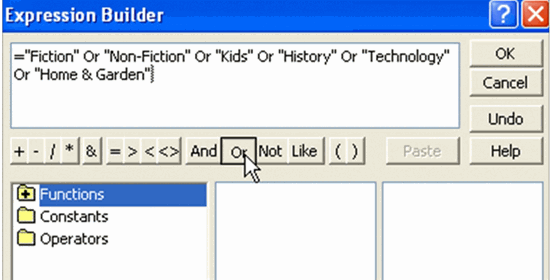 Validation Rule for Category Field
Validation rules work almost easily with numerical fields. Rules for text fields require you to enclose each acceptable value inside its ain quotation marks, separating them with Or, as seen in a higher place.
Validation text
Validation text is a specialized error message y'all tin can prepare to have Admission tell the user inbound data the specific way you want that person to enter information technology.
To prepare the validation text, enter the error message exactly as you desire it to appear to users in the row directly beneath the Validation Rule row in the Field Backdrop section of Blueprint view. For the validation rule we set for Category, you'd set the validation text similar this:
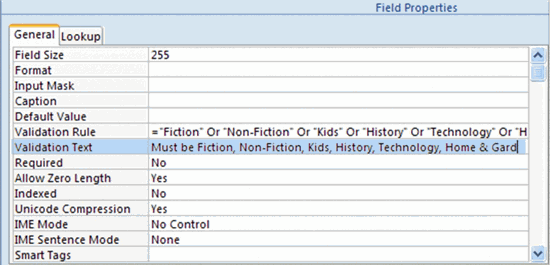 Validation Text for Category Field
The image beneath shows the resulting fault bulletin users would see when the Category validation dominion has been broken.
 Fault Bulletin Showing Validation Text
Using field properties to ensure data integrity
Another way to ensure information integrity is by setting field properties such as Field Size, Format, and Required.
- Field Size tin be set to concur a specific number of characters, up to every bit many equally 255 for text fields. If you were using a text field to hold the two-alphabetic character state postal abbreviation, the field size could be ready to ii to ensure no one enters a full state name into this field.
- The Format field property tin can be set to display text or numbers in a standardized way. For example, text can be ready to evidence every bit all majuscule, and numbers tin be set to show scientific numbers, percentages, or decimals.
- Set the Required property to Aye if you want users entering data to be required to enter something in the field. Choose No if users are allowed to exit the field blank.
These are just some means Admission helps you ensure data being entered into your database is valid.
Claiming!
If you lot haven't already done so, save the sample Ready2Read database to your computer.
- Open the database, and add records using the New Record navigation push button.
- Add together a record using the New Record control in the Ribbon.
- Edit a record using the Find and Supersede control.
- Re-create and paste a record in one of the tables.
- Prepare a validation rule and validation text for a field in one of your tables, so intermission the rule when entering data to read the resulting message.
/en/access2007/creating-and-using-forms/content/

Which Of The Following Allows You To Enter, Modify, Delete Or View Data Records?,
Source: https://edu.gcfglobal.org/en/access2007/entering-and-editing-data-in-tables/1/
Posted by: wisegion1993.blogspot.com
0 Response to "Which Of The Following Allows You To Enter, Modify, Delete Or View Data Records?"
Post a Comment